How to Create a Beautiful Photo Wall in 6 Simple Steps
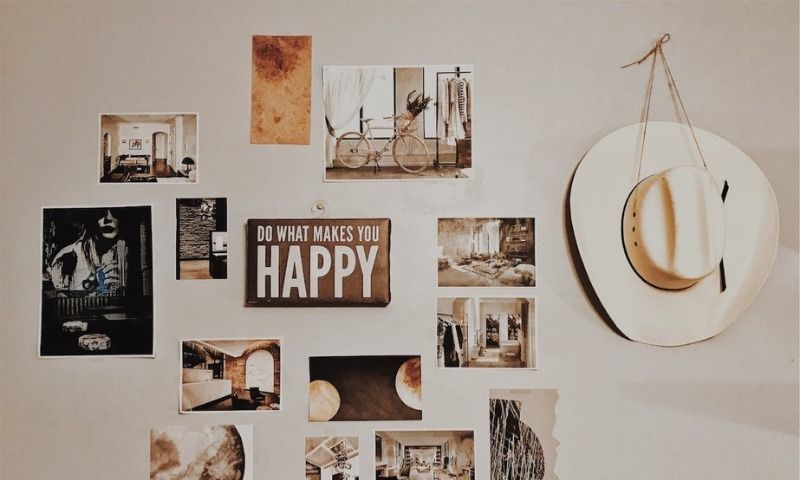
A picture is worth a thousand words; home is where the heart is, right? How often have we heard those phrases? Chances are, you have heard both of those statements and probably even said them yourself. Why? Because, well, they're true! So why not tell the stories you love on the walls surrounding you? And I don't mean your Instagram or Facebook wall... I mean the huge chunk of real estate that's a blank canvas in your living room, stairwell, or hallway.
We all love a good modern farmhouse floating shelves display. I'm as guilty of wanting all of the Mason jars in all of the places as every other millennial. But let's talk about other home ideas. Instead of heading to Hobby Lobby to decorate every inch of your home, dive into your own memories to create a wall that tells your unique story of you.
The concept of creating a photo wall can be daunting, but having enlarged photos covering your wall doesn't have to be scary.

Step 1: Choose the Right Wall for Your Photo Display
Before selecting photos or buying frames, start with the space itself. The wall you choose will influence everything—from the number of photos you'll need to the layout, frame sizes, and overall visual style.
A good photo wall should naturally draw attention without making the room feel cluttered.
Best Places for a Photo Wall
Some locations naturally work better than others.
Living Room
The living room is often the centerpiece of a home, making it the perfect place to display family memories or artwork. A large wall above the sofa or fireplace provides enough space for a balanced gallery wall with different frame sizes.
Hallway
Hallways are ideal for storytelling. Since people naturally walk through them, they create a timeline-like experience where every photo becomes part of a larger journey. Travel memories, children's milestones, or yearly family portraits all work beautifully here.
Staircase
The diagonal line of a staircase creates a dynamic space for photo arrangements. Instead of forcing everything into a straight grid, let your frames follow the angle of the stairs for a more natural flow.
Bedroom
Bedrooms call for a softer, more personal approach. Wedding photos, romantic travel memories, calming landscapes, or minimalist artwork can help create a cozy atmosphere.
Home Office
Working from home doesn't mean staring at blank walls all day. A small gallery wall filled with motivational quotes, favorite travel destinations, or meaningful family moments can make your workspace feel more inspiring.
Measure Before You Start
One of the biggest mistakes people make is purchasing frames before measuring the available wall space.
Take a few minutes to:
- Measure the width and height of the wall.
- Note nearby windows, doors, light switches, and furniture.
- Leave enough breathing room around your gallery wall so it doesn't overwhelm the room.
A simple sketch on paper can save you from expensive mistakes later.
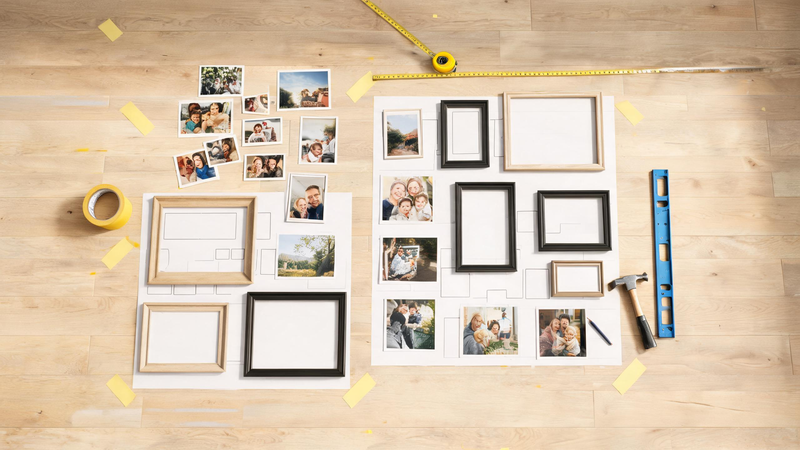
Pro Tip: Before hanging anything permanently, lay your frames on the floor or use paper templates taped to the wall to experiment with different arrangements. Seeing the layout at full size makes it much easier to identify awkward spacing or oversized frames before putting holes in the wall.
Step 2: Choose a Theme That Tells Your Story
A beautiful photo wall isn't just a collection of random pictures—it's a collection of connected memories.
Choosing a clear theme helps create a display that feels intentional rather than chaotic. While every photo doesn't need to match perfectly, they should share a common story, color palette, or emotional connection.
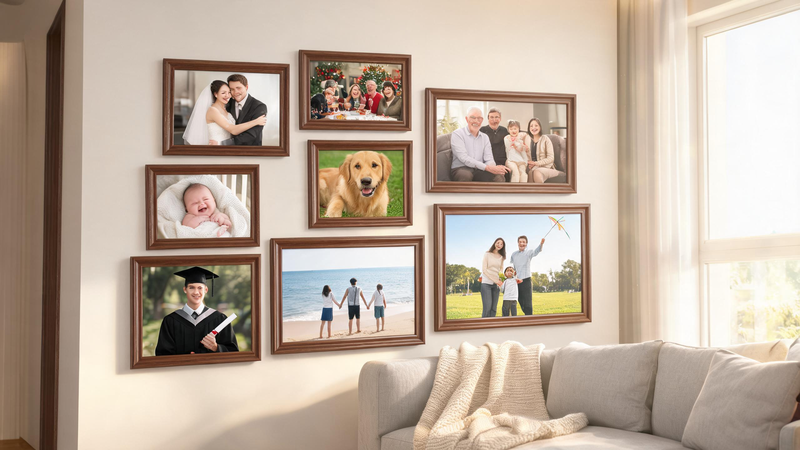
Family Memories
One of the most popular choices is a family-themed gallery wall.
Include everyday moments instead of only formal portraits:
- Children playing in the backyard
- Birthday celebrations
- Holiday gatherings
- Weekend adventures
- Funny candid moments
These authentic memories often feel far more meaningful than perfectly posed photographs.
Travel Adventures
If you love exploring new places, turn your favorite destinations into a travel gallery.
Mix different types of photos for more visual interest:
- Scenic landscapes
- Local architecture
- Street photography
- Food experiences
- Candid travel moments
Adding maps, postcards, or travel quotes alongside your photos can make the display even more unique.
Wedding & Special Celebrations
Wedding photos deserve more than staying inside a digital folder.
Instead of displaying dozens of nearly identical portraits, choose a balanced mix:
- The ceremony
- The first dance
- Close-up details like flowers or rings
- Emotional family moments
- Behind-the-scenes candid shots
This creates a gallery that tells the complete story of the day.
Nature & Landscape Photography
Nature photography works particularly well in modern and minimalist homes.
Forests, mountains, beaches, sunsets, flowers, and wildlife can introduce calming colors and textures into your living space while complementing neutral interior styles.
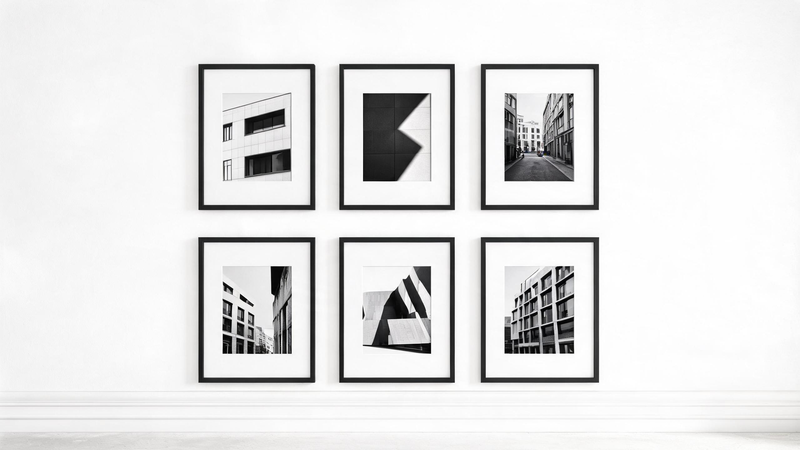
Black-and-White Collections
Using black-and-white photography instantly creates a timeless, elegant appearance.
Even if the photos were taken years apart, converting them into monochrome can unify the entire gallery and make different subjects feel visually consistent.
Don't Be Afraid to Mix Personal Photos with Artwork
A gallery wall doesn't have to consist entirely of photographs.
Many homeowners combine personal memories with illustrations, typography prints, paintings, or digital artwork to create a display with more personality and visual balance. The key is maintaining a consistent color palette or frame style so every piece feels like part of the same collection.
Once you've chosen a theme, you'll have a much easier time selecting frame styles, arranging your layout, and deciding which images deserve the largest display.
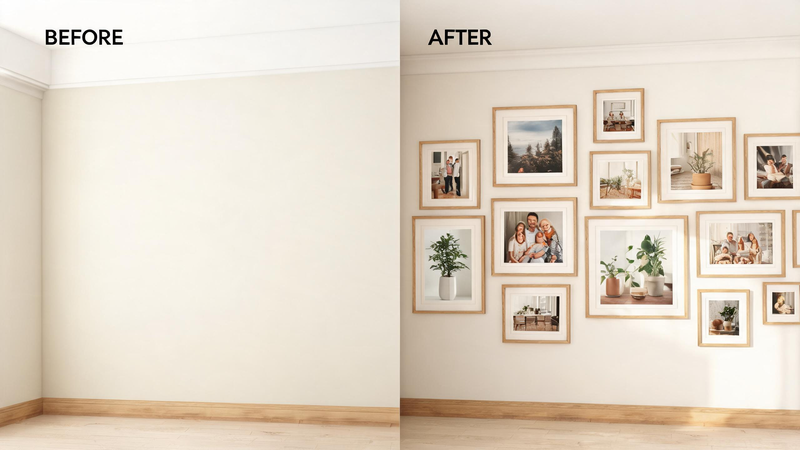
Before moving into the actual layout planning stage, it helps to visualize your gallery wall in advance.
Many people struggle to imagine spacing, frame sizes, and composition from sketches alone. A gallery wall preview tool solves this by letting you test different layouts digitally before making any physical changes.
You can upload your photos, experiment with arrangements, adjust spacing, and explore focal point placement in a virtual setup. This helps you avoid unnecessary adjustments and make more confident design decisions before hanging anything on the wall.
Step 3: Prepare High-Quality Photos for Printing
Now that you've chosen your wall and settled on a theme, it's time to prepare your photos. Even the most beautiful memories can lose their impact if they're printed at a low resolution or appear blurry when enlarged.
A little preparation before printing can make a huge difference in the final result.
Start with the Highest-Quality Images Available
Whenever possible, use the original photo instead of downloading images from social media or messaging apps. Platforms like Facebook, Instagram, and WhatsApp often compress images to reduce file size, which also reduces image quality.
If you're working with older family photos, try to scan them at a high resolution. A scan of at least 300 DPI is recommended for high-quality printing.
Choose the Right Print Size
Not every photo needs to be the same size. In fact, a mix of large and small prints often creates a more dynamic gallery wall.
Here are some popular frame sizes to consider:
| Print Size | Best For |
|---|---|
| 5 × 7 in | Accent photos and smaller spaces |
| 8 × 10 in | Standard portraits |
| 11 × 14 in | Featured memories |
| 16 × 20 in | Statement pieces |
| 20 × 30 | Large focal walls |
A common design approach is to use one or two larger prints as the visual centerpiece and surround them with medium and smaller frames.
What If Your Photos Are Too Small?
This is a common problem, especially if your favorite memories were taken years ago or cropped from older devices.
Simply stretching a low-resolution image usually results in blurry edges, pixelation, and loss of detail. Before printing, it's worth enhancing the image using an AI-powered image enlarger that can intelligently increase resolution while preserving textures and sharpness.
For example, AI upscaling tools can enlarge photos by 2×, 4×, or even 8×, making them much more suitable for larger frame sizes without noticeably reducing quality.
Bonus Tip: Restore Old Family Photos
If you're creating a family history wall, don't overlook old photographs.
Many vintage photos suffer from fading, scratches, or discoloration. Restoring these images before printing helps preserve precious memories while creating a cleaner and more consistent gallery wall.
Keep Your Colors Consistent
When printing photos from different cameras or smartphones, colors may vary noticeably.
Before sending your images to print:
- Adjust brightness if necessary.
- Correct overly warm or cool tones.
- Apply similar editing styles across all photos.
- Avoid excessive filters that may look dated over time.
A consistent editing style helps your entire gallery wall feel intentional and professionally designed.
Step 4: Plan Your Gallery Wall Layout
One of the biggest mistakes people make isn't choosing the wrong photos—it's hanging them too quickly.
Taking a little time to plan your layout before drilling holes into the wall can save hours of frustration and produce a much more polished result.
Choose a Layout Style
Different layouts create completely different visual effects.
Grid Layout
Perfect for modern and minimalist interiors.
Frames are evenly spaced and aligned both horizontally and vertically, creating a clean, organized appearance.
This layout works especially well when all frames are the same size.
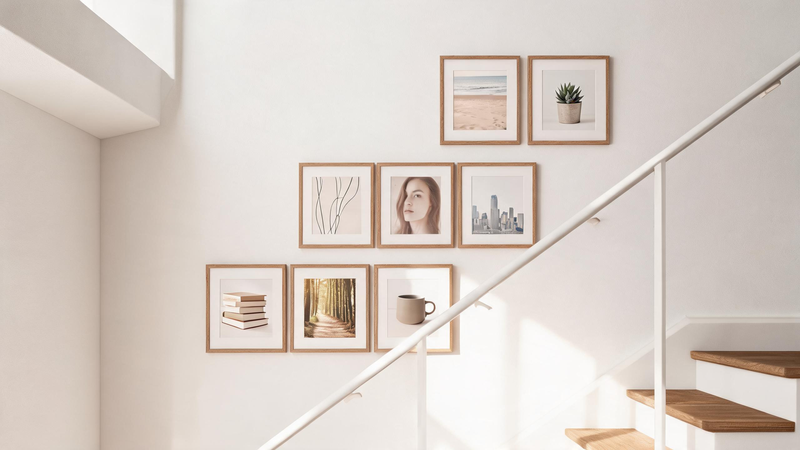
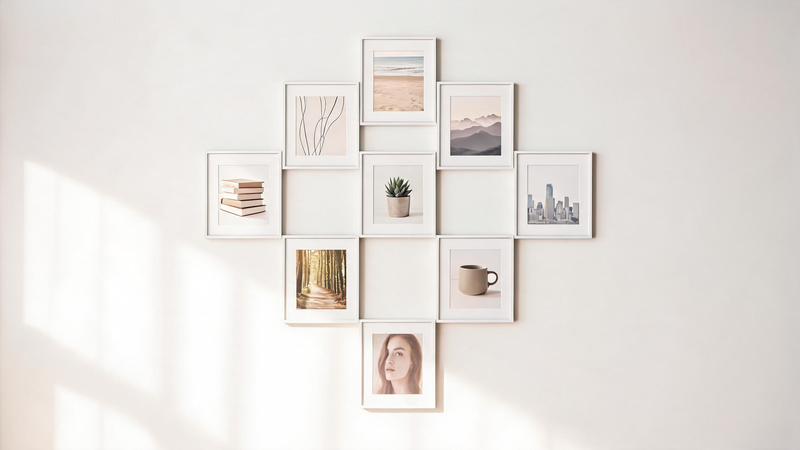
Organic Gallery Layout
Instead of strict symmetry, an organic layout mixes different frame sizes while maintaining visual balance.
This style feels more relaxed and works beautifully for family memories, travel photography, and eclectic home décor.
Linear Layout
Ideal for hallways or above a sofa.
Frames are arranged along a single horizontal line while varying in size above and below that central axis.
Staircase Layout
For staircase walls, follow the angle of the stairs rather than forcing frames into a rectangular arrangement.
This naturally guides the eye upward and creates a more harmonious display.
Test Your Arrangement First
Before hanging your frames, lay everything out on the floor.
Move pieces around until the composition feels balanced.
Another popular technique is to cut paper templates matching each frame size and tape them to the wall. This lets you experiment with spacing and positioning without making unnecessary holes.
If you're planning a larger gallery wall or mixing family photos with artwork, using a gallery wall planning or preview tool can also help you visualize different layouts before committing to a final arrangement.
Leave Enough Breathing Room
Spacing is just as important as the photos themselves.
As a general rule:
- Leave 2–3 inches (5–8 cm) between smaller frames.
- Leave 3–5 inches (8–12 cm) between larger frames.
- Keep the overall gallery visually connected rather than spreading frames too far apart.
Remember that your gallery wall should be viewed as one complete composition—not as a collection of individual pictures.
Create a Clear Focal Point
Every successful gallery wall has one image that immediately catches the eye.
This could be:
- Your favorite wedding portrait
- A breathtaking travel landscape
- A large family photograph
- A meaningful piece of artwork
Place this focal image slightly above eye level or near the center of the arrangement, then build the surrounding layout around it.
A strong focal point gives the entire display structure and makes the wall feel intentionally designed rather than randomly assembled.
Step 5: Choose Frames That Complement Your Style
Frames do much more than hold your photos—they help define the personality of your gallery wall. The right frames can make a collection of ordinary photos look polished and intentional, while mismatched styles may leave the display feeling disorganized.
The good news is that creating a beautiful gallery wall doesn't mean every frame has to be identical or expensive.
Match Your Home's Interior Style
Before shopping for frames, consider the overall style of your room.
Different frame materials create very different moods:
- Black frames offer a clean, modern appearance and work well with minimalist or contemporary interiors.
- White frames brighten smaller rooms and pair beautifully with Scandinavian-style décor.
- Natural wood frames add warmth and complement rustic, farmhouse, or bohemian homes.
- Metal frames create a sleek, industrial feel that's perfect for modern apartments.
Rather than choosing frames individually, think about how they'll look together as one complete collection.
Should Every Frame Match?
Not necessarily.
There are two popular approaches:
Uniform Gallery Wall
Using identical frame sizes and colors creates a structured, elegant appearance that's ideal for formal spaces.
This style works especially well for:
- Wedding photos
- Black-and-white photography
- Fine art prints
- Professional portraits
Eclectic Gallery Wall
If your goal is something more personal and creative, mixing frame sizes, colors, and textures can create a relaxed, collected-over-time aesthetic.
The key is consistency.
Even when mixing frames, try to keep one element consistent, such as:
- Similar wood tones
- Matching mat colors
- A limited color palette
- Consistent spacing
This prevents the wall from feeling visually overwhelming.
Don't Forget the Mat
A simple white mat can dramatically improve the appearance of your photos.
Matting creates breathing room around each image, making even smaller prints feel more premium while helping viewers focus on the photograph itself.
For larger statement pieces, wider mats can create an elegant, gallery-like presentation.
Shop Smart and Save Money
Creating a beautiful gallery wall doesn't have to be expensive.
Besides traditional home décor stores, consider looking at:
- Local thrift stores
- Flea markets
- Estate sales
- Facebook Marketplace
- Discount home retailers
Many people build stunning gallery walls by gradually collecting unique frames over time instead of purchasing an entire matching set at once.
Step 6: Hang Your Gallery Wall Like a Pro
After all the planning, editing, printing, and framing, it's finally time to hang your gallery wall.
Taking your time during this final step will ensure your display looks balanced, professional, and secure.
Start with the Centerpiece
Begin by hanging your largest or most important photo first.
This becomes the visual anchor for the rest of the arrangement.
Once the centerpiece is in place, work outward by adding surrounding frames one at a time.
This approach makes it much easier to maintain symmetry and consistent spacing.
Hang at Eye Level
A common decorating mistake is hanging artwork too high.
As a general guideline, the center of your gallery wall should sit around 57–60 inches (145–152 cm) from the floor, which is considered average eye level.
If your gallery is above a sofa, console table, or bed, leave approximately 6–10 inches (15–25 cm) between the furniture and the lowest frame.
This keeps everything visually connected.
Keep Frame Spacing Consistent
Consistency matters more than exact measurements.
Most interior designers recommend leaving approximately:
- 2–3 inches between small and medium frames.
- 3–5 inches between larger frames.
Avoid placing frames too close together, where they may feel crowded, or too far apart, where the gallery loses its sense of unity.
Use the Right Hanging Hardware
Different walls require different mounting methods.
For example:
- Drywall hooks work well for lighter frames.
- Picture-hanging hooks provide additional support for medium-weight artwork.
- Wall anchors are recommended for heavier frames.
- Adhesive strips are ideal for renters who want to avoid drilling holes.
Always check the weight capacity before hanging valuable artwork or oversized frames.
Step Back and Make Final Adjustments
Once everything is on the wall, don't rush to call it finished.
Stand several feet away and view the gallery from different angles.
Ask yourself:
- Does one frame feel too isolated?
- Is the spacing consistent?
- Does the gallery feel balanced?
- Is there a clear focal point?
Small adjustments of even an inch or two can make a surprisingly big difference in the overall appearance.
Remember, a gallery wall isn't about perfection—it's about creating a display that reflects your personality and brings your favorite memories to life every time you walk past it.
Frequently Asked Questions
What size photos work best for a gallery wall?
There's no single perfect size.
Most gallery walls combine several frame sizes to create visual interest. A common approach is to use one or two larger statement pieces (16 × 20 inches or larger) surrounded by medium and smaller prints such as 8 × 10 or 5 × 7 inches.
How far apart should picture frames be?
Most designers recommend leaving between 2 and 3 inches of space between smaller frames and 3 to 5 inches between larger ones.
Consistent spacing helps the gallery feel balanced and intentional.
Should all my frames match?
Not at all.
Matching frames create a clean, modern appearance, while mixed frames add personality and character.
As long as the colors, materials, or overall style complement one another, either approach can look beautiful.
Can I enlarge old photos for printing?
Yes.
Many older photos don't have enough resolution for large prints, but modern AI-powered image enhancement tools can increase image resolution while preserving details, making them suitable for larger frames.
Can I combine personal photos with artwork?
Absolutely.
Mixing family photos with paintings, illustrations, or digitally created artwork is becoming increasingly popular.
Keeping a consistent frame style or color palette helps create a cohesive gallery wall even when different types of artwork are displayed together.
Final Thoughts
Creating a beautiful photo wall isn't about following strict decorating rules—it's about telling your story in a way that feels personal and meaningful.
Start by choosing a location that suits your space, then select a theme that reflects your favorite memories. Prepare high-quality images, experiment with different layouts, and choose frames that complement your home's style. Taking time to plan each step will help you create a gallery wall you'll enjoy for years to come.
Most importantly, don't feel pressured to finish everything in one weekend. The best gallery walls often evolve over time as new memories are made.
Whether you're displaying family milestones, unforgettable vacations, wedding photos, or your favorite artwork, your gallery wall should reflect what matters most to you—and that's what makes it truly one of a kind.