Best Image Sharpener Lunapic vs. Imglarger vs. Imageonline
Introduction:
Digital images are integrated into our daily lives. From social media to websites of all kinds, images are everywhere. People use them to convey information, express ideas and express emotions. People are demanding more and more quality images, but not all are high quality. Some may become blurred as they are shared, so we need to use image editing tools to optimize them.
Sharpening is one of the features that can improve the clarity of images, so image sharpening tools are also an excellent way to do this. This article will synthesize the objective and more popular AI image sharpeners, Lunapic, Imglarger and Imageonline. To give you some help in the process of image sharpening, let’s take a look!
What is Image Sharpening?
Image sharpening is a digital image processing technique that aims to enhance the detail and sharpness of an image. Camera shake, slow shutter speeds or image compression during image capture can cause images to become blurry and lose clarity. Image sharpening makes the edges and details of elements in a picture more visible by increasing the contrast of adjacent pixels, resulting in a better visual effect.
Image sharpening needs to be moderate; excessive sharpening can lose the quality of the image. It makes the edges of elements appear noisy or haloed. Image sharpening cannot fix the details lost by compression and live downscaling, so we need to sharpen them appropriately to achieve a natural and aesthetically pleasing visual effect.
What is called an AI Image Sharpener?
AI Image Sharpener Review
Imglarger
Imglarger is a creative and versatile image editor with enhancement, zoom, erase, sharpen, noise reduction, face beautification, cartoonish images and background removal features. Imglarger highlights various features using AI deep learning algorithms to simplify the process and output excellent results. Imglargre can save us from the complicated process and increase our efficiency. Sharpening is one of its main features. Let’s see how it works.
Sharpen Image Using Imglarger
- Step 1: Click on AI Sharpen in All Tools.
- Step 2: Select the blue button “Select images” to upload the image.
- Step 3: Click the green button “Edit” to edit, click “Done” in the upper right corner to go to the next step, and click “Start” to start sharpening.
- Step 4: Select the green button “Download” to view and save the image after completing processing.
Lunapic
Lunapic is an easy-to-use free online image editor. It gives users a range of editing features to optimize their photos, including cropping, resizing, rotating and scaling, and special effects such as color adjustment, focus adjustment and animation effects. The interface of Lunapic is similar to that of Adobe Photoshop. A toolbar with various icons on the left makes it easy for users to navigate and edit.
Sharpen Image Using Lunapic
- Step 1: Click “Adjust” in the navigation bar and select the “Sharpen” function.
- Step 2: Upload the photo by clicking on the box or “more upload options”.
- Step 3: You can adjust the sharpening level on the top of the image according to the preview effect.
- Step 4: Click “Apply” to download and save the image, then click “Download Now” to return to the previous step and click “Undo this edit”.
Image Online
Image Online is a safe and free online image editor and image converter. It has no restrictions to support users to use it for free. There is no need to download it. Users can go to the web page and upload and edit the image. It has a wide variety of filters, from retro to modern. It is safe for users to handle their images, and they can use it with confidence.
Sharpen Image Using Image Online
- Step 1: Select “SHARPEN IMAGE” in the navigation bar after entering the webpage.
- Step 2: Wait for the page to finish jumping and click “UPLOAD IMAGE” to upload photos.
- Step 3: Adjust the degree of sharpening under the picture according to your needs and select “SHARPEN IMAGE” to start processing the picture.
- Step 4: Click “DOWNLOAD IMAGE” when finished.
Case Study: Sharpen Images Using Three AI Tools
In this part, you need to prepare two different images for sharpening. You will compare the sharpening effects of the three AI tools. Please try to choose a picture with more differentiation.
Example 1:

Imglarger Result
First, look at the above three pictures. The Imglarger sharpened effect picture is the second one. It does not have the setting to adjust the sharpening intensity, and the sharpening intensity of imglarger in the above three comparison pictures is relatively moderate.
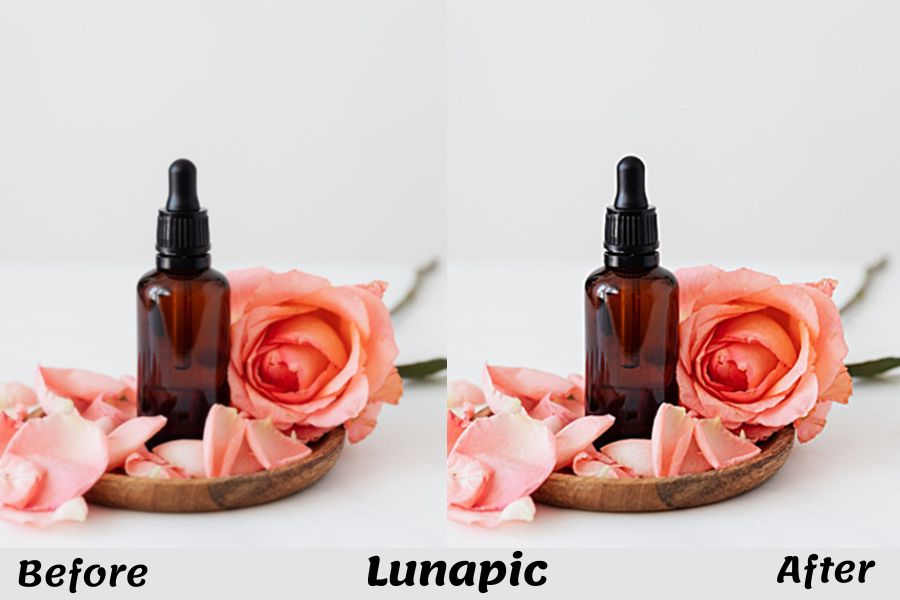
It is mainly through AI to analyze the picture and then identify the subject and background for intelligent optimization.Let’s look at the comparison chart below. The before and after effect of sharpening is visible to the naked eye, and the edge of the bottle and the edge of the petals are clearer. Look closely at the layers of the flower petals stacked where imglarger handled very naturally.
The overall image quality and resolution of the sharpened image look improved. If you want a natural visual effect and simplified steps, imglarger is a great place to try.
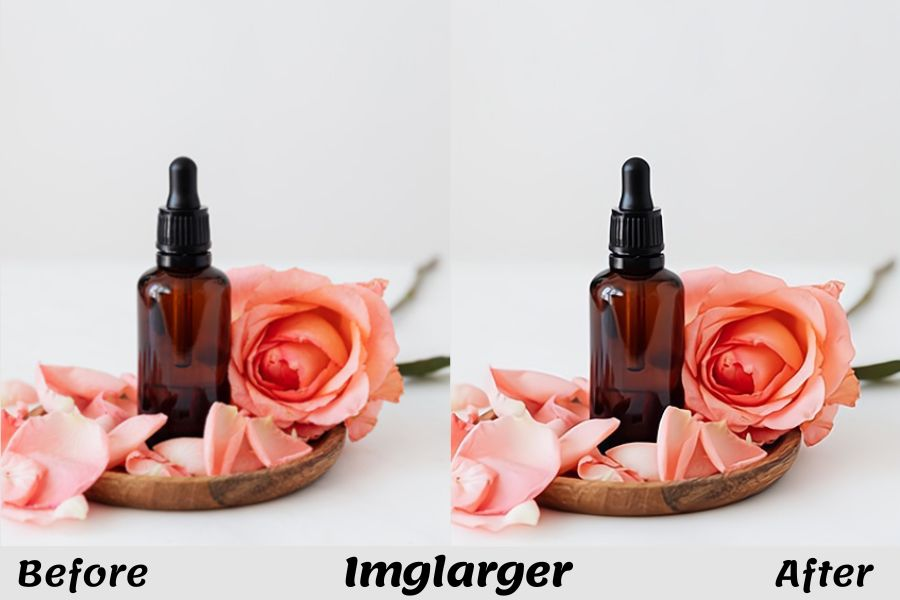
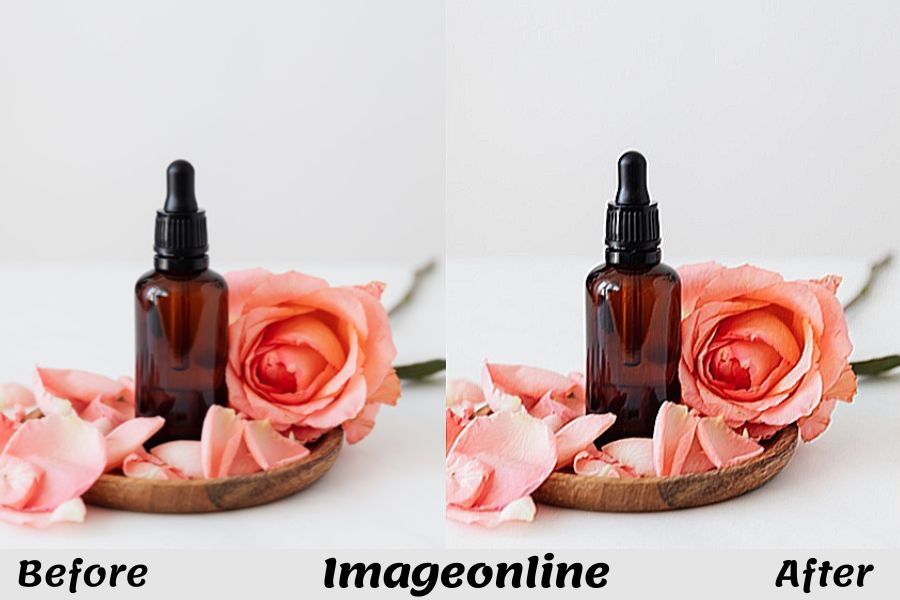
Image Online Result
Among lunapic, imglarger and image online, imageonline has the strongest sharpening intensity. I specifically tried to compare the sharpening intensity with lunapic to the same degree in adjusting the sharpening intensity, and the result is similar to the visual effect shown in the picture.
The bottle and flower edges are enhanced while the whole picture looks less natural, and the petal veins appear to be lowered in the whole picture. If you choose the right level of sharpening, the result will be better, and here you need to explore more about the sharpening intensity.
The intensity can be adjusted automatically, which will be more flexible for the user, so you need to try a few more times in the preview to choose the sharpening intensity you want.
Lunapic Result
The top three images it has a sharpening effect similar to imglarger, with a strong sense of the edges of the flowers and bottles. Also, the sharpened image quality has some improvement. The edge contour is too strong, so the whole photo does not have enough texture. The grain of the wooden plate is messy, and the simple enhancement without optimizing details will affect the visual effect.
Example 2:

Imglarger Result:
Comparing the three images simultaneously, we can see that the sharpening effect of imglarger is moderate. This is because it is automatically optimized. The intensity and parameters of sharpening are not automatically adjusted. Let’s look at the following picture more intuitively.
The image quality of the sharpened image is obviously improved with the naked eye. The details of the bottle’s mouth and finger joints are still preserved, and the sharpening leads to more clarity in these details.
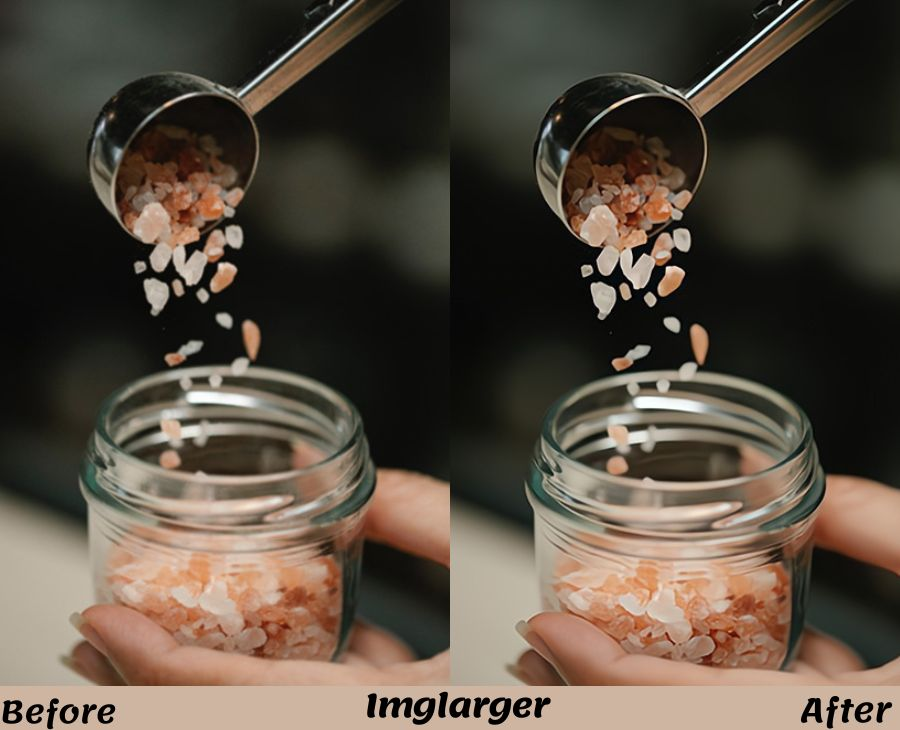
Image Online Result:
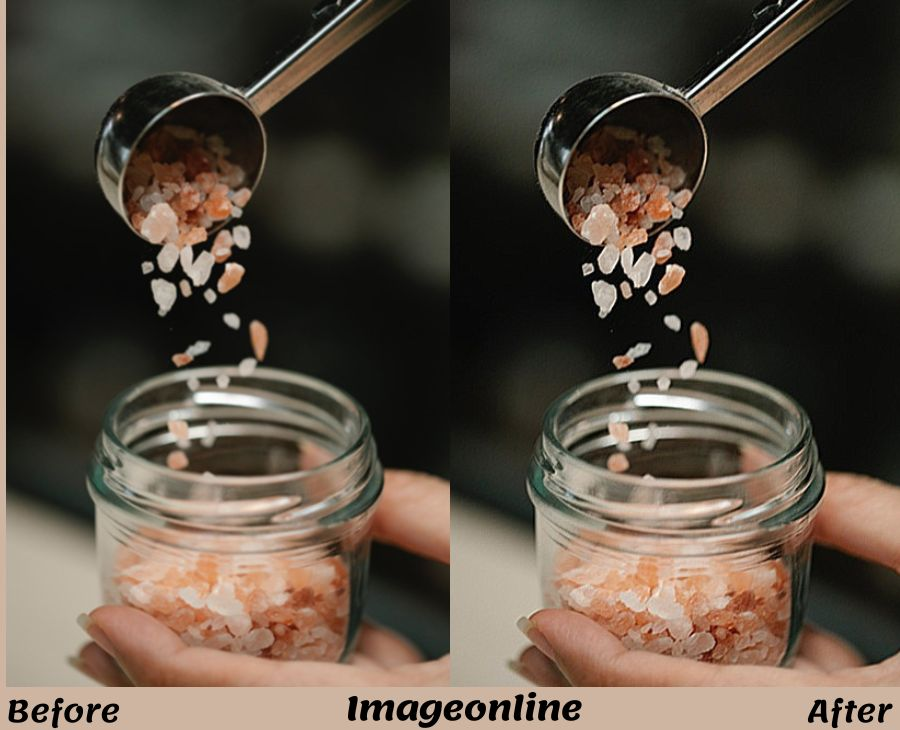
The Image online sharpened image shows the spoon and the main object of the cup with obvious edges, and the details, including the fingerprints on the finger, can be seen. The image looks good in general, but if you look closely, you will see that the image quality will be reduced if the image quality needs to be higher after sharpening.
Lunapic Result:
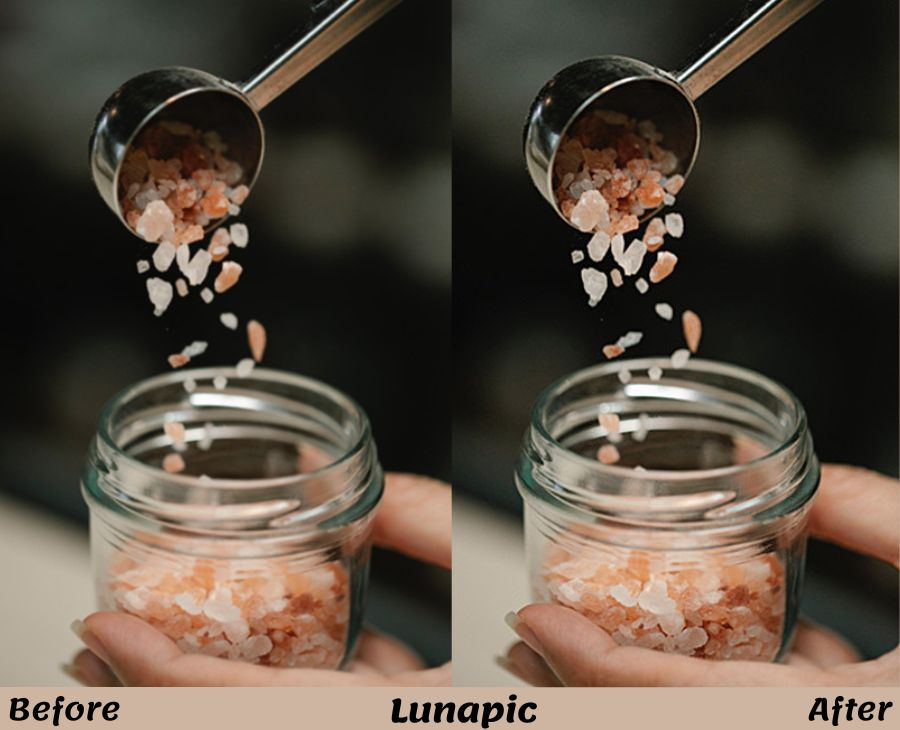
Lunapic’s effect is the lowest sharpening effect of the three tools. Paying attention to the comparison details will still show that it improves the image. For example, the edge of the spoon, the edge of the grain leaving the spoon, the pellets in the bottle, and the texture on the spoon handle. The slider’s position for sharpening parameter adjustment is the same as the position of Imageonline, and different tools have different degrees of sharpening.
Lunapic vs. Imglarger vs. Imageonline: Which AI Image Sharpener Works Best
- Easy to use:
The three tools sharpening steps are similar in terms of difficulty and ease. The lunapic and image online have adjustable sharpening intensity, and the imglarger is an AI sharpening that automatically adjusts according to the image.
- Fast sharpening speed:
Both imglarger and lunapic images online can sharpen images in seconds, and both process them very quickly.
- Output quality:
The overall effect of the output image imglarger is much better. They are combined with the AI effect, not only sharpening the picture but including detailed optimization and adjustment of color. Image online and Lunapic sharpening of the picture after the overall effect of the picture still needs to be optimized and improved.
- Free for paid
Lunapic and Imageonline are free to use, and imglarger has a free-to-use plan. Of course, if you want to unlock restrictions and explore more features, you can upgrade your account to achieve that.
- Limitations for free accounts
Imageonline and lunapic have no restrictions for free users. Imglarger has eight credits per month for a free account to support all features. Some features have restrictions on the size of uploaded images. Premium accounts are $9 monthly for 100 credits for all features with larger upload sizes.
- Support Preview Results
Image online and lunapic can preview the effect and facilitate the adaptation with the sharpening intensity adjustment bar. imglarger does not have a preview function.
- Support Batch Image Sharpening
Imglarge supports batch processing, and lunapic and image online only support single processing.
- Support Further Editing
For the single sharpening function, imglarger supports basic editing, including parameter adjustment, filters, blurring and painting. lunapic and image online support adjustment of sharpening intensity, and their other functions are separate from the sharpening function. Users can choose other functions to optimize their images.
Conclusion:
By reading this article, you will gain an understanding of sharpening, including what level of sharpening is appropriate. The article also compares Lunapic, imageonline, and imglarger’s AI sharpen, giving step-by-step instructions to make it easier for users. It also analyzes the effect of the three tools on the same image so that users can feel the difference between them more intuitively.
The most suitable tool depends on the user’s needs and preferences for sharpening images. Users can compare the three image enhancers after using them. Users can compare and contrast the three image enhancers and choose the right one after experiencing the advantages and disadvantages of each tool. Let’s pick up an image and try it out!
