How to Resize an Image Free and Online
Are you seeking to enhance minute details in a photograph? Do you require a larger-than-life image for a specific purpose? Whether it's for printing, digital media, or personal projects, resizing images accurately is paramount.
In this guide, we'll explore the art of resizing images effectively using AI-powered tools AI Image Enlarger. Additionally, we'll delve into specifications for common image sizes and techniques to amplify image dimensions without compromising quality.

1. What Is the Best Image Size?
To answer the question: it depends on what you’re using the photo for.
If you remember, pixels are tiny colored dots that form images. The higher your image's pixel density or resolution, the more detailed it is. With a smaller resolution, your image becomes blurry or pixelated.
If you’re printing an image, you want it to be at the right size. This should be at 300 dots per inch (DPI) at 100% size. Also, 300 DPI is the industry standard for quality photographs.
In the internet era, web images have much lower resolutions. If you’ve noticed, the images you download online often have 72 DPI. This is because computer monitors from the 1980s only had resolutions of 72 DPI.
The truth is the resolution of an image doesn’t have any connection to how you view the image on your screen. However, there is a huge difference between 72-DPI and 300-DPI resolution images on paper. In actuality, DPI is a guide for printers.
When you print an image, consider how large the print will be and the type of printer you’ll use. Use 200-225 DPI for laser printing, 267-300 DPI for commercial offset press, and 360 DPI for photo stylus inkjet. Also, a larger print needs a higher resolution.
It’s worth noting that prints will often need higher resolutions. If you’re building a website, it’ll be smart to use high-resolution images too. If need be, you can always enlarge an image.
Commonly Used Image Sizes
- Facebook Cover Photo:
- Dimensions: 820 pixels wide by 312 pixels tall
- Aspect Ratio: 1.91:1
2. Instagram Profile Picture:
- Dimensions: 110 pixels wide by 110 pixels tall
- Aspect Ratio: 1:1
3. Instagram Post (Square):
- Dimensions: 1080 pixels wide by 1080 pixels tall
- Aspect Ratio: 1:1
4. Instagram Post (Portrait):
- Dimensions: 1080 pixels wide by 1350 pixels tall
- Aspect Ratio: 4:5
- Dimensions: 1500 pixels wide by 500 pixels tall
- Aspect Ratio: 3:1
6. YouTube Channel Art:
- Dimensions: 2560 pixels wide by 1440 pixels tall
- Aspect Ratio: 16:9
7. LinkedIn Banner Image:
- Dimensions: 1584 pixels wide by 396 pixels tall
- Aspect Ratio: 4:1
8. PC Wallpaper:
- Dimensions: Varies by screen resolution, commonly 1920 pixels wide by 1080 pixels tall (Full HD)
- Aspect Ratio: 16:9
2. How Resizing Photos Affect Them
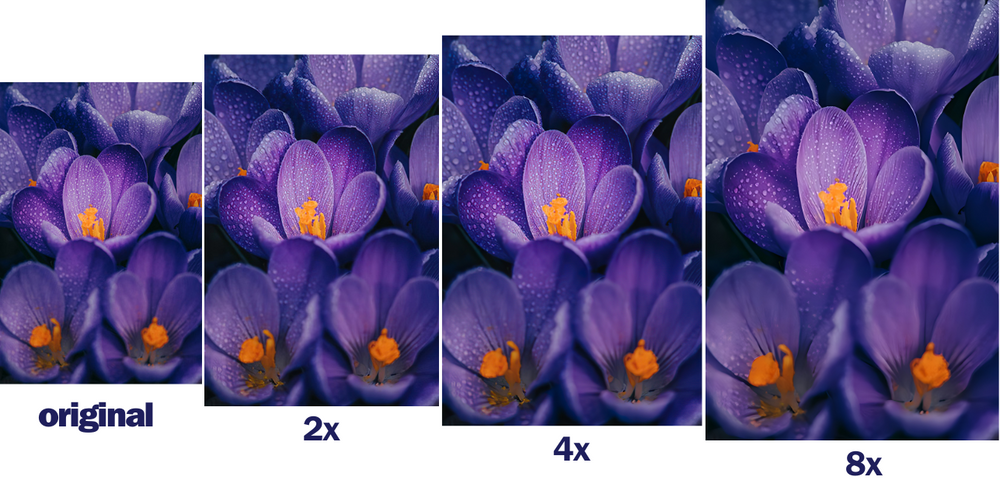
Changing the dimensions of a photo often leads to a loss of quality, especially when you’re enlarging it. You won’t lose quality when you change the picture size to smaller unless you enlarge it back to a larger image again.
As you know, the pixels that form the image are already fixed to a specific location to create the image. When you enlarge the image, the pixels remain in the same places, so the image stays the same. The problem with enlarging images is you only end up enlarging the pixels that form them.
This is what creates the pixelated look on enlarged photos. Opening, editing, and then saving JPEG images also are cause for quality loss. This is why some people get frustrated when their images don’t look as good on paper after they edit them.
This is why you can get a smaller image of the mind-blowing 81-megapixel moon photo by Andrew McCarthy. However, you can’t get the same image details after you save it in a smaller resolution. The secret to having no regrets when resizing images is to edit a copy rather than the original image.
3. How to Resize an Image with AI Image Enlarger
The problem is learning how to resize images without losing their quality. The internet offers many solutions that help you change the size of an image. For this, we introduce to you the AI Image Enlarger.
The AI Image Enlarger uses an AI that retains the details while it enlarges images. The AI for our image enlarger also uses machine learning technology. That means the AI studies the different photos it enlarges and improves upon its detailing and enlargement process.
When it comes to resizing photos, it’s never going to be easier than using the AI Image Enlarger. All you need to do is to go to the main page. Click on the Select Files button.
Note the file limits:
- Less than 3MB
- Less than 800 width x 750 height
- Only .jpg, .jpeg, and .png extensions
After you upload the images, choose a style. The styles include Artwork, Photo, Face, and High-Grade. You can enlarge it twice or 4x the size of the original uploaded image.
After choosing the style, click submit to get a preview of it. All that’s left to do is click Download, and you’ve got your enlarged image for free. Resizing your photos has never been easier than before.

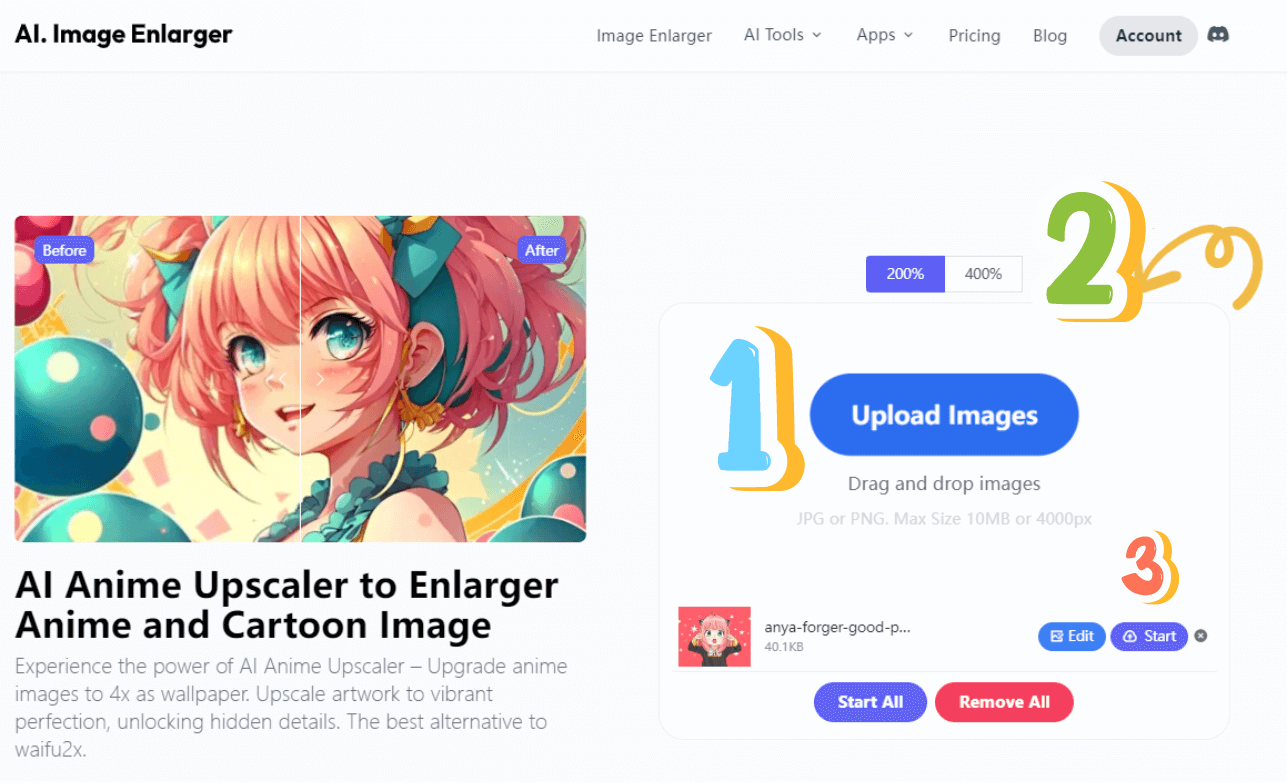
How to Use AI Image Enlarger to Resize Images
- Step 1: Enter the page of the image enlarger. You will see a box on the right side of the page. Click "Upload Images" to upload the images you need to edit.
- Step 2: After the image is uploaded successfully, select the magnification (200%, 400%, and 800%) and click "Start" at the back of the image to start the process.
- Step 3: After completing the processing, you can click the purple eye icon to preview and slide the vertical line left and right to see the comparison effect. If you need to edit the image, click "Edit".
- Step 4: If you need to save it, click the purple "Download" button.
4. Tips on Resizing Images
If you’re resizing an image for your website, ensure it’s already in the correct dimensions. For example, a banner image is almost always wider than it is taller. If you don’t want the image to stretch out sideways or get cropped, ensure they’re already in the right dimensions.
If you’re one of the 81% of Americans who use smartphones, you might have also tried to get some of the photos you took from your phone printed. One reason for low-resolution images taken from your phone is the image settings. Make sure your photos are set to have the highest resolution to get the best images for resizing.
Start Resizing Your Photos
Resizing images is now simpler and more efficient with AI technology. The AI Image Enlarger offers a user-friendly solution without the need for complex software. Preserve image quality while expanding dimensions effortlessly. Explore our blog for more insightful posts and feel free to reach out to our team for further assistance.
Enhance your images today with AI Image Enlarger and unlock a world of possibilities in digital imaging. For inquiries or additional information, feel free to email our team.